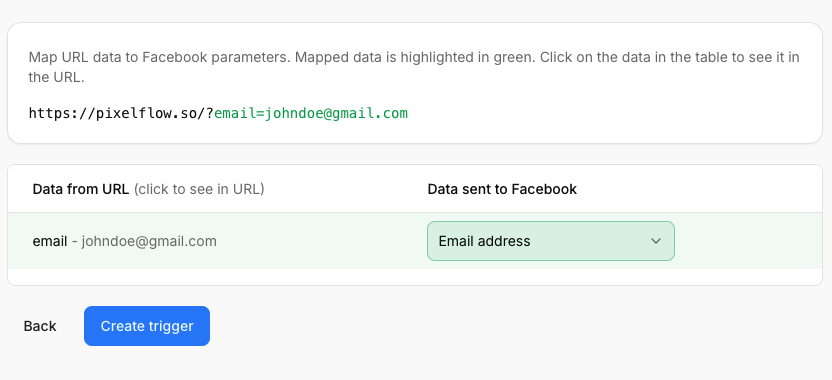
When your confirmation or success page includes useful data in the URL, PixelFlow can extract those query parameters and send them with the event. Paste a full example URL during page-load setup; if parameters are present, the wizard opens Confirm what's in your URL so you can map each value.
How URL parameter extraction works
If your URL contains additional information after the ?, PixelFlow detects it during page-load setup and asks you to map each parameter before the trigger is created.
For example, a booking confirmation URL can look like this:
If you fire a Lead event from yourwebsite.com/booking-confirmed, you can map values such as email and full name so they are sent with the event.
This works with both static URLs and dynamic URLs. Dynamic URLs are common when booking or signup tools append query parameters to your redirect URL.
Set up extraction in the page-load wizard
Extraction is part of creating a page-load trigger. Start from Track more events, choose your event, then select When a page loads.
On Which page should trigger this event?, paste a full example URL under Page URL, including every query parameter you want to capture.
When PixelFlow detects parameters, it shows that extra information was found and that you will map it next. Click Next (not Create trigger).
On Confirm what's in your URL, review each detected parameter and choose what it represents.
Click Create trigger.
PixelFlow remembers those mappings and fills them in automatically the next time someone reaches a matching page.
If no parameters are detected, expand Paste full URL with query parameters if any on the page URL step and paste a complete confirmation link that includes values after the question mark.
Fields you can map
Each field can only be used once. Available mappings include:
Full name
First name
Last name
Email address
Phone number
Order value
Quantity
Currency
Country
State
City
Postal code
If the same field is assigned twice, PixelFlow asks you to choose a different option for the highlighted rows. Create trigger stays disabled until mappings are unique and at least one mapping exists.
Platform examples
Calendly
Calendly can redirect someone to a page on your own domain after they book.
Set up the redirect URL in Calendly
In your event type, edit the booking
Click More Options
In the confirmation page settings choose Redirect to an external site
Turn on Pass event details to your redirected page so Calendly appends booking details to the end of your redirect URL.
Those details can include values such as the event name, invitee name, invitee email address, and UTM tags.
Use that full redirected URL as the example URL in PixelFlow and map the parameters you want to send with the event.
Calendly requires a paid plan for redirect-based confirmation pages and for PixelFlow's webhook-based Calendly integration. If you want direct webhook tracking instead of URL trigger tracking, see Trigger Events from Calendly Bookings.
Cal.com
Cal.com can redirect people to a page on your own domain after they book, with booking details appended as query parameters.
Set up the redirect URL in Cal.com
In your Cal.com dashboard, go to your event type settings.
Open Advanced settings.
Turn on Redirect to a custom URL after a successful booking.
Enter your confirmation page URL (for example, https://yoursite.com/booking-confirmed).
Make sure Forward parameters is enabled (this is on by default). This appends booking data to your redirect URL.
Available parameters
Cal.com includes these parameters in the redirect URL:
uid — unique booking identifier
title — event type title
startTime / endTime — UTC ISO 8601 timestamps
email — primary attendee email
attendeeName — full attendee name
attendeeFirstName / attendeeLastName — first and last name separately
When you set up your page-load trigger in PixelFlow:
Enter the full redirected URL as the example URL.
Continue to Confirm what's in your URL.
Map parameters such as:
email → Email address
attendeeName → Full name
attendeeFirstName → First name
attendeeLastName → Last name
phone → Phone number
Some parameters are conditional and will not appear in every redirect. For example, phone and attendeeLastName only appear if the booking form collected that information.
Outseta
Outseta lets you send new signups to a custom page after signup.
Set up the redirect URL in Outseta
In Outseta, go to AUTH > SIGN UP AND LOGIN
Under Sign Up Settings enter your destination in Post Sign Up URL and click SAVE.
If your post-signup URL includes customer data like name or email, PixelFlow can extract those values when the visitor lands on that page.
Tally forms can pass submitted data through a redirect URL using a calculated field. When someone submits your form, they land on your thank-you page with name, email, phone, or other values appended as query parameters.
Set up the redirect URL in Tally
Build your form with input blocks for the data you want to pass. Add blocks for Name, Email, and Phone. Note the exact labels you give them.
Add a calculated field at the bottom of your form. Type /calculated to insert it, then name it something like redirect_url.
Build the URL formula by concatenating a base string with references to each answer block. For example:
Replace @name, @email, and @phone with the actual references to your form blocks. Tally will autocomplete these when you type @.
Set the redirect. Go to Settings → After submission → Redirect to URL and set the destination to @redirect_url (referencing your calculated field).
When someone submits the form, they are redirected to your thank-you page with the values appended. Use that full redirected URL as the example URL in PixelFlow and map the parameters you want to send with your event.
A note on calculated fields: Tally's calculated fields are designed primarily for numeric operations. String concatenation with text answers works but can be inconsistent, especially with special characters. If a user's name has a space or their email has a + in it, the values won't be URL-encoded automatically. This can break the redirect or mangle the query string on the receiving end. Test your form with various inputs to catch edge cases.