
How to Connect Your Meta Pixel & Conversions API
Overview
This guide shows you how to connect your Meta Pixel and Conversions API (CAPI) to PixelFlow. You'll provide two pieces of information: your Pixel ID and Conversions API Key. Once connected, PixelFlow automatically loads both your browser-based Pixel and server-side Conversions API together, ensuring perfect event deduplication and capturing 30-40% more conversion data than the Pixel alone.
PixelFlow runs your Meta Pixel and Conversions API simultaneously. The browser Pixel tracks client-side events while CAPI sends the same events server-side, with automatic deduplication to prevent double-counting. This dual approach bypasses ad blockers and iOS restrictions that affect browser-only tracking.
Prerequisites
A PixelFlow account with an active subscription
Access to your Meta Events Manager
A Meta Pixel already created in your Events Manager
Step 1: Find Your Meta Pixel ID
Go to the Meta Events Manager and click on Data Sources.
Select the Pixel you want to connect with PixelFlow.

Click on Settings in the left sidebar.
Copy your Dataset ID (this is your Pixel ID).

Keep this Events Manager tab open—you'll need it again in the next step to generate your Conversions API Key.
In PixelFlow, click the Add Pixel button.
Enter a name for your pixel and paste the Dataset ID into the Meta Pixel ID field.
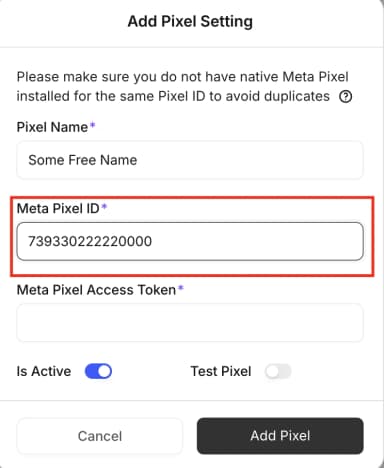
Don't click save yet—you still need to add your Conversions API Key in the next step.
Step 2: Generate Your Conversions API Key
Return to the Meta Events Manager Settings page for your selected Pixel.
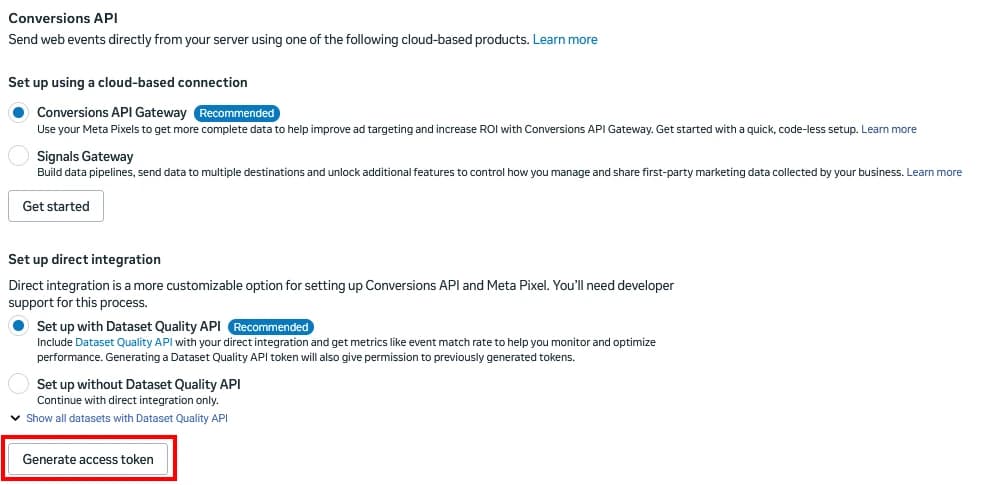
Scroll down to the Setup Direct Integration section.
Choose Set up with Dataset Quality API.
Click the Generate Access Token button.
Select your dataset from the dropdown menu.
Click Generate access token and copy the generated token.
Store this token securely. Meta only shows it once—if you lose it, you'll need to generate a new one.
Return to PixelFlow and paste the access token into the Meta Pixel Access Token field.
Click Save to complete the connection.

Verify the Setup
Once you've saved your Pixel and Conversions API Key:
Your Pixel will appear in your PixelFlow dashboard with a green "Connected" status
Both browser Pixel and server-side CAPI events will fire automatically when you install the PixelFlow script on your website
Check the PixelFlow event logs to see both event types being tracked and deduplicated
You can verify events are firing correctly by checking your Meta Events Manager Test Events tool or PixelFlow's payload logs after installing the tracking script on your site.
What's Next
Now that your Pixel and Conversions API are connected:
Install the PixelFlow tracking script on your website
Configure which events you want to track (form submissions, button clicks, page visits, etc.)
Review your event match quality score in Meta Events Manager (aim for 8.0+)
Troubleshooting
Issue | Cause | Solution |
|---|---|---|
"Invalid Pixel ID" error | Incorrect Dataset ID copied | Double-check you copied the Dataset ID (not Pixel Name) from Settings |
"Invalid access token" error | Token expired or incorrectly copied | Generate a new Conversions API Key and ensure you copy the entire token |
Events not showing in Meta | PixelFlow script not installed yet | Complete the website integration to start sending events |
Duplicate events in Meta | Multiple tracking implementations | Remove other Pixel installations—PixelFlow handles both Pixel and CAPI automatically |
Getting Help
If you encounter issues connecting your Pixel or Conversions API:
Check that you have admin access to both your Meta Events Manager and PixelFlow account
Verify your Meta Business Manager permissions allow API token generation
Contact PixelFlow support with your Pixel ID (never share your Conversions API Key) for assistance
Book a free setup call through the PixelFlow dashboard for hands-on help