
Event Classes on WordPress
How to label specific elements on your WordPress website and assign events to them
For information on how to track events by assign a specific event to a particular URL, follow this guide.
To tag specific elements on your website that you'd like to track, follow the guide below.
If you're using WooCommerce, PixelFlow can automatically add tracking classes to your eCommerce elements. See the WordPress Setup guide for details on enabling WooCommerce integration.
How to Use Event Classes on WordPress
Add the class from the Classes Document to that particular element in WordPress. The method depends on which page builder or editor you're using:
Using the WordPress Block Editor (Gutenberg)
The default WordPress editor makes it easy to add custom classes to any block:
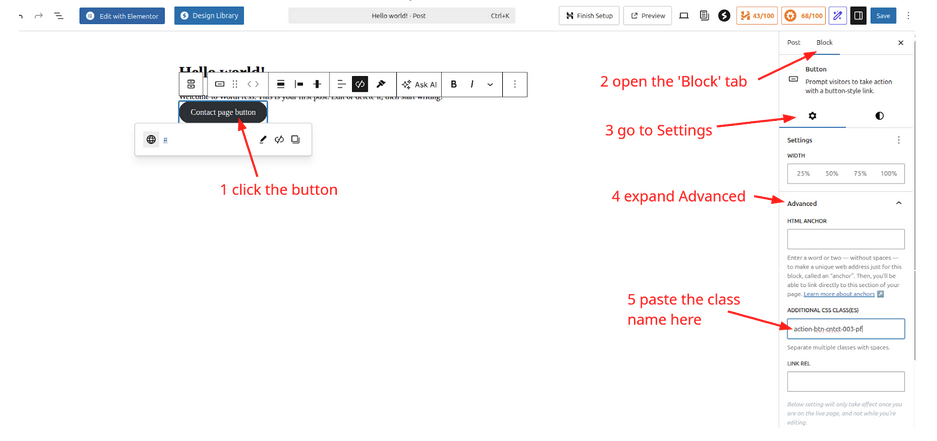
Select the block (button, form, or any element) you want to track
In the right sidebar, click the Block tab if not already selected
Scroll down to the Advanced section and expand it
In the Additional CSS Class(es) field, enter the PixelFlow class name (for example,
action-btn-sub-002-pffor a Subscribe event)Click Update or Publish to save your changes
You can add multiple classes by separating them with spaces. For example, to track a Subscribe event and add form data extraction, you might use: action-btn-sub-002-pf info-frm-cntr-pf
Using Elementor
If you're using Elementor as your page builder:
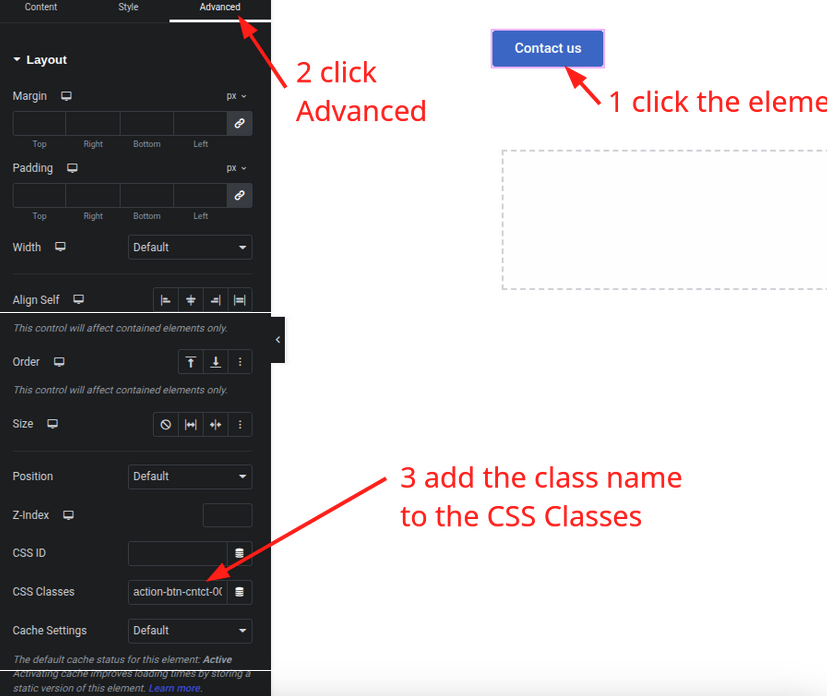
Click on the element you want to track in the Elementor editor
In the left panel, click the Advanced tab
Find the CSS Classes field (or Additional CSS Classes depending on your Elementor version)
Enter the PixelFlow class name from the Classes Document
Click Update to publish your changes
Make sure to publish or update your page after adding classes. Changes won't take effect until the page is live.
Using Other Page Builders
Most WordPress page builders have similar options for adding CSS classes:
Divi Builder: Select the module → Advanced tab → CSS ID & Classes section → CSS Class field
Beaver Builder: Select the module → Advanced tab → CSS Selectors section → Class field
WPBakery: Edit the element → Design Options tab → Extra class name field
Kadence Blocks: Select block → Advanced tab → Additional CSS Class(es) field
Example: Tracking a Subscribe Button
If you want to track a "Subscribe" event every time someone clicks a specific "Subscribe" button on your website:
Find the Subscribe class from the Classes Document:
action-btn-sub-002-pfSelect your Subscribe button in your WordPress editor or page builder
Add
action-btn-sub-002-pfto the CSS class field using the method for your editor (see above)Save and publish your changes
Once published, PixelFlow will automatically track Subscribe events whenever users click that button and send the data to Meta.
Tracking Form Submissions
To track form submissions and capture user data (name, email, phone), you need to add classes to both the form container and individual input fields:
Add
info-frm-cntr-pfto your form container or form elementAdd the appropriate action class to your submit button (e.g.,
action-btn-lead-011-pffor a Lead event)Add data extraction classes to your input fields:
info-cust-fn-pffor first name inputinfo-cust-em-pffor email inputinfo-cust-full-name-pffor full name inputinfo-cust-ph-pffor phone inputinfo-cust-ln-pffor last name input
For popular form plugins like Contact Form 7, WPForms, or Gravity Forms, you may need to add classes through the form builder's settings or use custom CSS selectors. Check your form plugin's documentation for how to add custom classes to form elements.
Verifying Your Setup
After adding classes to your elements:
Visit your page on the live website (not in preview mode)
Right-click the element and select Inspect or Inspect Element
In the developer tools, verify that the PixelFlow class appears in the HTML code for that element
Test the tracking by triggering the event (clicking the button, submitting the form, etc.)
Check your PixelFlow dashboard to confirm the event was captured
If you're using a caching plugin (WP Rocket, W3 Total Cache, etc.), make sure to clear your cache after adding classes. Otherwise, visitors may see the old version of your page without the tracking classes.
Common Issues and Solutions
Classes Not Appearing on Live Site
Clear your WordPress cache if you're using a caching plugin
Make sure you clicked Update/Publish after adding the class
Check that you added the class to the correct element
Verify you're viewing the live page, not a preview or draft
Events Not Tracking in PixelFlow Dashboard
Verify the PixelFlow script is installed correctly (check the WordPress Setup guide)
Confirm you're using the exact class name from the Classes Document
Make sure the class is added to the clickable element (button, link) not a wrapper div
Check your browser console for JavaScript errors that might prevent tracking
Form Data Not Being Captured
Ensure
info-frm-cntr-pfis added to the form containerVerify input field classes are added to the actual
<input>elements, not labels or wrappersFor custom form plugins, you may need to add classes through plugin-specific settings
What's Next
View the complete list of available classes in the Classes Document
Learn about tracking events via URLs as an alternative method
Set up WooCommerce integration for automatic eCommerce tracking